In the competitive landscape of modern branding and personal correspondence, the ability to make a memorable, high-quality impression is paramount. Foil engraving emerges as a sophisticated finishing technique that masterfully combines the tactile depth of traditional engraving with the luminous sheen of metallic foil. This dual-sensory appeal elevates printed materials from simple media to objects of perceived value, making it an indispensable tool for luxury packaging, formal invitations, and premium business collateral where communicating prestige and attention to detail is essential.
However, achieving a flawless execution of this technique is contingent upon the quality and capabilities of the equipment employed. The significant variation in machinery, from hobbyist presses to industrial-grade systems, makes the selection process a critical determinant of the final output’s professionalism. This guide is designed to navigate these complexities, offering a detailed analysis and review to identify the best foil engraving solutions available. By examining key performance metrics, features, and user suitability, this resource provides the necessary information for consumers and businesses to make an informed investment, ensuring their projects meet the highest standards of quality and aesthetic appeal.
We will discuss the best foil engraving further down, but for now, consider checking out these related items on Amazon:


Last update on 2025-08-23 / Affiliate links / #ad / Images from Amazon Product Advertising API
Analytical Overview of Foil Engraving
Foil engraving, a process traditionally known as hot foil stamping, has evolved significantly, marking a key trend toward greater accessibility and design complexity. Initially the domain of large-scale industrial printing for luxury goods, advancements in digital foiling technology have lowered the barrier to entry, empowering small businesses, boutique stationers, and even artisans. This democratization is fueling market growth, with the global hot stamping foils market projected to expand at a CAGR of over 4.5% in the coming years. The primary driver is the increasing demand for premium, differentiated packaging and printed materials that stand out in a saturated marketplace, shifting foil application from a niche luxury to a mainstream signifier of quality.
The benefits of incorporating foil engraving are both aesthetic and commercial. Its most significant advantage is the immediate elevation of a product’s perceived value and shelf appeal. The tactile and visual contrast of a metallic or pigmented foil against a substrate creates a powerful sensory experience that consumers associate with luxury and high quality. For premium brands in sectors like cosmetics, spirits, and high-end stationery, achieving the best foil engraving is not just a decorative choice but a strategic one to communicate exclusivity and justify a higher price point. Furthermore, its versatility across substrates—from paper and cardboard to leather and plastic—provides extensive creative freedom for designers.
Despite its growing popularity, the process presents distinct challenges. Traditional hot foil stamping requires the creation of a custom metal die for each design, which can be cost-prohibitive for short runs or projects with variable data, posing a significant hurdle for smaller-scale operations. The process is also technically demanding, requiring precise control over temperature, pressure, and dwell time to achieve a clean impression without damaging the substrate. Inconsistencies can lead to material waste and increased production costs. Moreover, as sustainability becomes a greater concern for consumers, the environmental impact of traditional metallic foils, which are essentially micro-thin plastic films, is coming under increased scrutiny.
Looking forward, the future of foil engraving is being shaped by innovation in both technology and materials. Digital foiling systems that operate without dies are resolving the cost and time challenges of short-run production, opening the door for hyper-personalized products. Simultaneously, the industry is responding to environmental concerns with the development of more sustainable options, including recyclable and compostable foils. The market is also seeing a surge in specialty foils, such as holographic, pearlescent, and textured finishes, offering designers an even broader palette to create impactful and memorable products that capture consumer attention.
Best Foil Engraving – Reviewed
Cricut Foil Transfer Tool
The Cricut Foil Transfer Tool is a pressure-activated system designed for seamless integration with Cricut Maker and Cricut Explore series machines. The kit includes a single housing and three interchangeable tips, offering fine, medium, and bold line weights for varied design effects. This system operates without heat, utilizing the machine’s downward force to press foil from a proprietary carrier sheet onto the target material. The entire process is managed within Cricut’s Design Space software, which provides step-by-step prompts, making it highly accessible for users already familiar with the Cricut ecosystem. The absence of a heat element eliminates warm-up time and reduces safety concerns associated with hot components, allowing for immediate operation upon setup.
In terms of performance, the tool produces clean, consistent, and well-defined lines, particularly on smooth to medium-textured cardstock. The pressure-based mechanism is highly precise, but its efficacy can diminish on heavily textured or soft surfaces where uniform contact is difficult to achieve. From a value perspective, this tool represents a cost-effective and user-friendly expansion for existing Cricut users. Its primary limitation is its closed-ecosystem design, which necessitates the use of both a Cricut machine and Cricut-branded Foil Transfer Sheets. For individuals invested in this platform, it provides a reliable method for adding metallic embellishments without the complexity or potential material damage associated with heat-based alternatives.
We R Memory Keepers Foil Quill All-in-One Kit
The We R Memory Keepers Foil Quill is a heat-based foiling system engineered for broad compatibility with most major electronic cutting machines, including Silhouette, Cricut, Brother, and Sizzix models. The All-in-One Kit is a comprehensive package containing three pen tips of varying thicknesses (fine, standard, bold), four machine-specific adapters, a heat-resistant plate, and placement tape. A key design feature is its USB power source; the pens connect to an external power bank or USB wall adapter rather than drawing power from the cutting machine itself. This universal power solution is central to its cross-platform functionality, though it necessitates management of an external cord during machine operation.
The Foil Quill consistently delivers high-quality, detailed, and vibrant results that closely resemble traditional hot foiling. Performance is robust across a variety of materials, from paper to faux leather, provided the user calibrates the machine’s speed and pressure settings appropriately. The primary operational challenge involves ensuring the USB power cable does not impede the full range of motion of the machine’s carriage. The kit’s value proposition is exceptionally strong due to its versatility and adaptability. It effectively democratizes heat foiling for users of nearly any cutting machine, offering a cost-effective and high-performance alternative to brand-exclusive, proprietary systems. This makes it an ideal investment for crafters who own multiple machine brands or prioritize flexibility.
Spellbinders Glimmer Hot Foil System
The Spellbinders Glimmer Hot Foil System is a dedicated platform that operates in conjunction with a manual die-cutting machine to produce professional-grade foiled results. The system consists of a self-contained heating base, a power cord, a silicone cooling mat, a magnetic tool for handling hot plates, and starter foil rolls and Glimmer Hot Foil Plates (specialized metal dies). It is designed primarily for the Spellbinders Platinum and Platinum 6 machines but is compatible with many other die-cutters that can accommodate its platform-and-shim sandwich thickness. The mechanism involves heating the metal plates on the platform, arranging the foil and material, and then passing the entire assembly through a die-cutting machine to apply even and significant pressure.
This system’s performance is its defining feature, delivering a superior finish characterized by crisp, clean foil transfer with a noticeable debossed impression. It excels at foiling solid shapes, intricate designs, and sentiments with a quality that rivals commercial hot foil stamping, a result that pen-based systems cannot easily replicate. The process is more manual and time-intensive than automated plotter methods, requiring careful plate and material alignment. In terms of value, the Glimmer system represents a significant investment aimed at serious hobbyists and crafters who prioritize final output quality above all else. Its value is realized in its premium results and the extensive library of available Glimmer Plates, positioning it as a bridge between consumer-grade crafting tools and professional finishing equipment.
Silhouette Heat Pen Set
The Silhouette Heat Pen Set is a heat-activated foiling tool designed specifically for native integration with newer Silhouette cutting machines, including the Cameo 4/5, Portrait 3, and Curio 2. The set includes two pens with distinct tip sizes (1.5mm and 2.5mm) that plug directly into the powered tool carriage of these compatible machines, eliminating the need for external cords or power sources. The system requires the use of heat-activated foil, and the entire foiling process is configured and executed through Silhouette Studio software. The direct power integration allows the machine to control the heat cycle, providing a streamlined user experience from digital design to physical output.
In performance testing, the Silhouette Heat Pens produce a bright, metallic finish with a subtle debossed effect, creating a high-quality aesthetic. The 2.5mm bold tip is particularly effective for creating impactful, solid-filled designs. The heat transfer is consistent and reliable on recommended materials like cardstock and faux leather. The system’s primary constraint is its limited compatibility, functioning only with specific Silhouette models that feature a powered tool port. For owners of these machines, the Heat Pen Set offers excellent value, providing a seamless, integrated solution for achieving professional-looking heat foil effects. The value is diminished for users outside this specific hardware ecosystem, but for the target user, it represents a worthwhile investment to maximize the machine’s built-in capabilities.
Manual Hot Foil Pen
A manual hot foil pen is a handheld, heat-activated tool designed for freehand foil application, independent of any digital cutting machine. These tools are typically powered via a USB cable or batteries and often come with a single standard tip, though some models offer interchangeable points. Their function is straightforward: the user guides the heated tip over a sheet of heat-activated foil, tracing or writing a design to transfer it onto a substrate like paper, leather, or wood. This tool class offers complete artistic freedom, enabling users to create unique, hand-drawn illustrations and calligraphy that cannot be replicated by a machine.
The performance of a manual hot foil pen is entirely contingent on the user’s skill and stability. While it provides unparalleled creative control, achieving consistent pressure, even heat distribution, and precise lines requires significant practice. Results can vary from beautifully organic to patchy and uneven, particularly with lower-quality pens that have inconsistent heat regulation. From a value standpoint, the manual pen is the most accessible and lowest-cost entry point into heat foiling. Its value lies not in precision or repeatability but in its capacity for personal, artistic expression. It serves as an excellent supplementary tool for adding bespoke touches to projects but is an impractical choice for users who require the accuracy and automation of a machine-driven system for executing digital designs.
The Enduring Appeal of Foil Engraving: A Mark of Distinction
Foil engraving, a specialized printing process that uses heat, pressure, and metallic foil to create elegant, imprinted designs, serves a fundamental need for differentiation and perceived value. In a marketplace saturated with digital media and standard print, the tactile and visual impact of foil creates an immediate impression of quality and permanence. For businesses, this translates into a powerful branding tool that elevates marketing materials, packaging, and corporate stationery from mere information carriers to tangible representations of the company’s commitment to excellence. Similarly, for personal use, such as wedding invitations or fine art prints, foil engraving communicates a sense of occasion, importance, and personal care that standard methods cannot replicate. The primary need is to make a memorable, high-quality statement that stands out.
From a practical standpoint, the need for the best foil engraving is driven by the demand for precision and durability. High-quality execution ensures crisp, clean lines, complete foil coverage without flaking, and perfect registration on the substrate. This level of craftsmanship is crucial; a poorly executed foil stamp can look cheap and unprofessional, undermining the very goal of the investment. The best services utilize superior dies, premium foils, and advanced machinery capable of handling a wide array of paper stocks and materials. This technical proficiency allows for intricate designs and consistent results across large print runs, a practical necessity for product packaging and corporate branding where uniformity is key to maintaining brand integrity and ensuring the final product meets exacting quality standards.
Economically, the decision to invest in premium foil engraving is a strategic one centered on return on investment (ROI) and brand equity. While the initial outlay is higher than for conventional printing, the economic driver is the significant increase in perceived value. A product packaged with expertly applied foil can command a higher price point and attract a more discerning clientele, directly boosting revenue. For service-based businesses, a foil-engraved business card or brochure acts as a physical testament to the quality of their work, increasing memorability and conversion rates. The economic calculation is not about minimizing cost but about maximizing impact and positioning a brand or event in a premium tier.
Ultimately, the need for the best foil engraving is an economic imperative for those seeking to build and protect brand value. Choosing a top-tier provider mitigates the financial risk of a subpar product that could damage a brand’s reputation. The added cost is an investment in quality assurance and a competitive edge. In a commercial environment, this distinction can be the deciding factor for a consumer choosing between two competing products on a shelf. The economic logic is clear: investing in a superior tactile and visual presentation generates a return through enhanced customer perception, stronger brand loyalty, and increased profitability, justifying the choice for the highest quality foil engraving available.
Comparing Foil Engraving Technologies: Heat vs. Pressure
The world of consumer-grade foil engraving is primarily dominated by two distinct technologies: heat-activated systems and pressure-activated systems. Understanding the fundamental differences between these methods is critical to selecting a tool that aligns with your creative goals and material preferences. Heat-activated tools, such as the We R Memory Keepers Foil Quill or similar heated styluses, utilize thermal energy. A metal tip is heated to a specific temperature, and when it presses the specialized, heat-reactive foil onto a substrate, the adhesive layer on the foil is released and bonds the metallic layer permanently to the surface. This process mimics traditional hot foil stamping on a smaller, digitally controlled scale, often resulting in a very bright, smooth, and seamlessly bonded finish.
Pressure-activated systems, most notably exemplified by the Cricut Foil Transfer Tool, operate on a completely different principle. These tools do not require any heat or electrical power. Instead, they rely on the precise, calibrated downward force of a digital cutting machine to transfer the foil. The tool holds a fine point that presses a special pressure-sensitive foil sheet against the material. The sheer force of this pressure causes the metallic layer to release from its carrier sheet and adhere to the substrate below. This method eliminates warm-up times and the risk of heat damage to delicate materials, offering a more straightforward and arguably safer user experience.
The choice between heat and pressure carries significant implications for the final aesthetic and material compatibility. Heat-activated foiling tends to produce a slightly more brilliant and lustrous finish, as the heat helps the foil “melt” into the surface texture of the material, creating a very solid and opaque metallic line. This method excels on smooth cardstock, faux leather, and some treated papers. However, the requisite heat can be a liability, posing a risk of warping or discoloring heat-sensitive materials like vellum, thin acetate, or certain types of vinyl. The required warm-up period and the presence of a USB cord can also be minor workflow inconveniences.
Conversely, pressure-activated foiling offers superior versatility with heat-sensitive materials and simplifies the overall process. With no cords or pre-heating, users can switch between cutting and foiling more rapidly. The quality of the transfer, however, is heavily dependent on the machine’s pressure settings and the absolute smoothness of the substrate. On materials with even a subtle texture, the foil may not transfer with perfect uniformity, sometimes resulting in a slightly “distressed” or less opaque appearance compared to heat-foiled results. Furthermore, these systems are often proprietary, locking the user into a specific brand of foil designed to work with that tool’s pressure profile.
Material Compatibility: Choosing the Right Substrate for Flawless Results
The success of any foil engraving project is as dependent on the substrate as it is on the tool and foil themselves. The single most important characteristic for a receptive material is a smooth, non-porous surface. Foil, whether activated by heat or pressure, requires a uniform surface to achieve a clean and complete transfer. Rough, heavily textured materials, such as cold-press watercolor paper or handmade paper with visible fibers, present a significant challenge. The peaks and valleys of the texture prevent the foil from making consistent contact, resulting in a broken, patchy, or incomplete transfer that lacks professional polish.
For paper-based projects, your best results will come from smooth, heavy-weight cardstock, typically in the 80 lb to 110 lb range (approximately 216 to 300 gsm). Coated or satin-finish papers are particularly effective, as their sealed surface prevents the foil’s adhesive from being absorbed unevenly, promoting a crisp and brilliant bond. Glossy photo paper can also yield spectacular, high-shine results, especially with heat-activated systems. In contrast, highly absorbent, uncoated papers can dull the foil’s finish or cause it to bleed at the edges. When selecting paper, prioritize smoothness and density over all other qualities for predictable, high-quality outcomes.
Beyond paper, foil engraving opens up possibilities with a variety of other substrates. Smooth faux leather (PU leather) is an excellent candidate, accepting foil beautifully to create customized journals, keychains, and patches. Vellum is another popular choice that produces elegant, translucent effects, but it must be handled with care; pressure systems are often safer, as excessive heat can easily warp or melt the delicate material. Thin, rigid plastics and acetate can also be foiled, but testing is paramount. With heat tools, the temperature must be low enough to prevent melting, while with pressure tools, the force must be calibrated to avoid cracking the substrate.
Ultimately, the key to mastering material compatibility is rigorous testing. Before embarking on a final project, always perform a small test on a scrap piece of your chosen material. This analytical step is not optional for professional-level work. It allows you to confirm that the material is suitable and helps you dial in the perfect settings, whether it’s the pressure level on your cutting machine or the heat setting on your stylus. A small test swatch can save you from wasting a large sheet of premium material and ensures your final design transfers with the clarity and durability you intend.
Foil Engraving vs. Traditional Finishing Methods
While foil engraving with a digital cutter is a relatively new innovation for the craft market, it exists within a long history of professional finishing techniques. Understanding its position relative to these traditional methods, such as hot foil stamping and metallic ink printing, provides crucial context for its strengths and limitations. Foil engraving’s primary advantage is its accessibility and suitability for custom, low-volume production. It democratizes the ability to create bespoke foiled goods without the immense setup costs and industrial equipment required by its commercial counterparts, making it ideal for hobbyists, small business owners, and designers prototyping their work.
The most direct commercial comparison is traditional hot foil stamping. This industrial process involves creating a custom metal die (a stamp) of the desired design. This die is heated and then pressed with immense force against the foil and substrate, simultaneously transferring and debossing the design into the material. The result is an exceptionally durable, high-quality finish with a tactile dimension that digital foil engraving cannot fully replicate. However, the creation of a custom die is expensive and time-consuming, making hot foil stamping economically unviable for one-off projects or runs of fewer than several hundred pieces. Digital foil engraving serves as the perfect substitute for this exact use case.
Another related technique is embossing and debossing, which are methods of altering the surface of the paper itself. Embossing creates a raised impression, while debossing creates a recessed one. While these can be combined with foil in a commercial setting (a process called foil embossing), they are fundamentally about texture, not adding a metallic layer. Digital foil engraving, by contrast, is an additive process that applies a layer of material on top of the substrate. While some very minor debossing can occur, especially with pressure-based systems, its primary function is to add metallic shine and color, not to reshape the paper’s structure.
Finally, one must consider metallic inks and pens as an alternative. These mediums achieve a metallic look by suspending fine metallic flakes within an ink or gel base. While they can produce very fine details and are easily integrated into printing or drawing, they fundamentally differ from foil. Ink is absorbed into the paper’s fibers, which can often dull the metallic effect and reduce its reflectivity. Foil, on the other hand, sits entirely on the surface, creating a true, uninterrupted mirrored finish that ink cannot achieve. Foil engraving provides a level of brilliance and a true metallic quality that is a distinct step up from the shimmer of even the highest-quality metallic inks.
Maximizing Durability and Longevity of Your Foiled Projects
Creating a beautiful foiled design is only half the battle; ensuring it remains pristine over time requires a deliberate and analytical approach to its construction and care. The durability of a foiled element begins with its application. A flawless, well-bonded transfer is inherently more resistant to wear and tear. This means using the correct settings for your specific tool, foil, and substrate combination. Insufficient heat or pressure will result in a weak bond that is prone to flaking with even minimal handling. Conversely, excessive heat can make the substrate brittle around the design, while excessive pressure can score the material, creating weak points. Achieving the optimal transfer is the first and most critical step in preservation.
Once a project is foiled, its handling and potential exposure to environmental factors become the primary determinants of its longevity. For items that will be frequently handled, such as journal covers, business cards, or planners, the risk of abrasion is high. The metallic layer of the foil is microscopically thin and can be scratched or rubbed off over time. To mitigate this, consider applying a protective sealant. A clear, non-yellowing acrylic spray sealer or a brush-on decoupage medium (like Mod Podge) can provide a durable topcoat. It is absolutely essential to test the sealant on a scrap piece first, as some solvent-based sealers can react with the foil and cause it to dissolve or lose its sheen. Water-based artist’s fixatives are often a safer choice.
Environmental conditions also play a crucial role, particularly for items intended for display. Prolonged exposure to direct sunlight can cause some foils, especially colored varieties, to fade over time. Furthermore, high humidity or direct contact with moisture can compromise the foil’s adhesive, leading to peeling or bubbling. For framed art pieces, using UV-protective glass or acrylic is a wise investment to preserve the vibrancy of the foil. For functional items like coasters, it is vital to use a robust, waterproof sealant to protect the design from condensation and spills, which would otherwise quickly ruin the foiled surface.
Ultimately, the required level of protection should be dictated by the project’s intended use. A wedding invitation, for example, is a short-term item that is handled minimally and requires little more than a proper initial application. A foiled book cover or a custom phone case, however, is a high-contact item that demands a robust protective strategy, including the selection of a durable base material and the application of multiple layers of a compatible sealant. By analytically considering the end-use of your project from the outset, you can take the necessary steps to ensure your foil engraving work not only looks stunning upon completion but also endures as a lasting piece of craftsmanship.
A Comprehensive Buying Guide to the Best Foil Engraving Tools
Foil engraving, a captivating craft that marries the luminous sheen of metallic foil with the precision of engraving, has emerged as a premier method for adding a touch of elegance and professionalism to a vast array of projects. This technique transcends simple printing by creating a tangible, light-catching impression on surfaces, elevating everything from bespoke wedding invitations and greeting cards to sophisticated business branding and personalized gifts. The allure lies in its ability to produce results that look and feel luxurious, a quality once reserved for commercial print houses but now accessible to hobbyists, artisans, and small business owners alike. However, the market for foil engraving tools is diverse, encompassing a range of technologies, from manual heat pens to sophisticated digital accessories. Navigating this landscape can be daunting. This guide provides a formal, analytical framework for your purchasing decision, dissecting the critical factors you must consider. By understanding the nuances of tool mechanisms, material compatibility, and long-term costs, you will be empowered to select the ideal instrument that aligns with your creative vision, technical skill, and project demands, ensuring you find the best foil engraving solution for your unique needs.
1. Tool Type and Mechanism: Manual vs. Digital
The most fundamental decision in your foil engraving journey is the choice between a digital tool, which integrates with an electronic cutting machine, and a manual tool, which you guide by hand. Digital foiling systems, such as the Cricut Foil Transfer System or the We R Memory Keepers Foil Quill, operate as accessories for machines like a Cricut, Silhouette, or Brother ScanNCut. These tools leverage the machine’s precise X-Y plotter mechanism to execute intricate designs from a digital file with flawless repeatability. The primary advantage here is precision; these machines can operate at resolutions that ensure even the most delicate, complex patterns are rendered perfectly, time after time. This makes them the superior choice for producing batches of identical items, like invitations or branded packaging. The learning curve is tied to the design software (e.g., Cricut Design Space, Silhouette Studio), which requires some acclimatization but ultimately offers immense control over the final product. For crafters and businesses prioritizing consistency and complexity, a digital system is often the path to achieving the best foil engraving results.
Conversely, manual foil engraving tools, predominantly in the form of heated pens, offer a completely different user experience centered on artistic freedom and accessibility. Products like the We R Memory Keepers Freestyle Pen are self-contained, cordless or corded devices that heat up, allowing the user to draw designs directly onto a surface over a sheet of foil. Their greatest strengths are the low cost of entry and the organic, free-form creativity they enable. A high-quality heat pen can be acquired for between $20 and $50, a fraction of the cost of a digital cutting machine setup, which can easily surpass $400. This makes them an excellent starting point for those wishing to experiment with the craft. These pens often come with a variety of interchangeable tips—fine, bold, and even calligraphy-style—to create varied line work. The trade-off, however, is a lack of mechanical precision and repeatability. The quality of the result is entirely dependent on the user’s steady hand and artistic skill, and large or detailed projects can be physically taxing to complete.
2. Heat vs. Pressure Activation: The Science of the Shine
The method of foil transfer—heat or pressure—is a critical technical distinction that directly impacts the durability, finish, and material compatibility of your projects. Heat-activated systems are the traditional standard and are used in both hobbyist tools and professional hot foil stamping machines. In this process, the tool’s tip heats to a specific temperature, typically ranging from 250°F to 300°F (120°C to 150°C). This heat melts a specialized adhesive layer on the back of the foil, bonding the metallic pigment to the substrate. The primary benefit of this method is the creation of a highly durable, permanent, and often more lustrous finish that is resistant to scratching and wear. Heat activation is also more versatile in terms of materials, capable of adhering foil to not just paper and cardstock but also more challenging surfaces like faux leather, ribbon, and some treated wood veneers, significantly broadening creative possibilities.
Pressure-activated systems, most notably the Cricut Foil Transfer Tool, represent a newer, more convenient approach. Instead of heat, these tools utilize the significant downward force generated by the digital cutting machine to transfer the foil. The Cricut Maker 3, for instance, can apply up to 4 kilograms of force through a specialized housing containing a pressure-activated tip. This immense, focused pressure cold-fuses the foil onto the material’s surface. The most significant advantage is safety and convenience—there are no hot components, no pre-heating time, and no cords to manage, creating a streamlined, user-friendly workflow. However, the resulting bond is generally considered less robust than a heat-set transfer and can be more susceptible to being scratched off. Furthermore, pressure systems are most effective on smooth, non-porous surfaces like cardstock and vinyl, as the pressure must be distributed evenly to achieve a clean transfer, limiting their material versatility compared to their heat-based counterparts.
3. Machine and Material Compatibility
When investing in a digital foiling tool, compatibility is not just a feature; it is a foundational requirement. It is absolutely essential to verify that the tool you are considering is compatible with your specific model of electronic cutting machine. For example, the Cricut Foil Transfer Tool is designed exclusively for the Cricut Explore and Cricut Maker families of machines and will not function with Silhouette or Brother machines. In contrast, the We R Memory Keepers Foil Quill was designed with broader compatibility in mind, shipping with a set of four distinct adapters (labeled A, B, C, and D) that allow it to fit in the tool carriages of most major machine brands, including Cricut, Silhouette, Brother, and Sizzix. Overlooking this critical detail can result in purchasing an expensive, non-functional accessory. It is also wise to check the manufacturer’s website for firmware and software compatibility notes, as updates can sometimes affect tool performance.
Beyond the machine, the compatibility between your tool, your foil, and your base material is what will ultimately dictate the quality of your work. Each foiling system is optimized for specific materials. Heat-activated systems, with their ability to melt adhesive, perform exceptionally well on a spectrum of materials ranging from lightweight paper to thick 110 lb (300 gsm) cardstock, chipboard, and even select non-paper surfaces. Pressure-activated systems, however, are more finicky. They require a smooth, firm surface to ensure the pressure is applied evenly, making them ideal for cardstock within a specific weight range, typically 65 lb (176 gsm) to 100 lb (270 gsm), as well as sticker paper and printable vinyl. Using a material that is too soft or textured can result in an incomplete or patchy transfer. The best foil engraving practice involves a harmonious trifecta: the right tool for the right machine, applying the right type of foil to the right material. Experimentation with scrap material is always recommended before committing to a final project.
4. Tip Variety and Project Versatility
The versatility of a foil engraving tool is directly proportional to the variety of tips it supports. A system with interchangeable tips allows a crafter to move beyond a single, monotonous line weight and introduce hierarchy, detail, and stylistic flair into their designs. Most quality digital foiling kits come standard with a trio of tips: a fine tip, a medium tip, and a bold tip. A fine tip, often measuring around 0.5mm, is indispensable for intricate patterns, delicate script fonts, and adding subtle details to larger designs. A medium or standard tip, typically 1.0mm-1.5mm, serves as the all-purpose workhorse, ideal for general text, clear outlines, and the majority of everyday foiling tasks. A bold tip, measuring 2.5mm or more, is used to create impactful headlines, fill in larger areas with solid color, and produce dramatic, eye-catching effects.
The practical impact of this variety is profound, transforming a simple tool into a comprehensive design system. Imagine creating a wedding invitation suite: you could use the fine tip for the delicate RSVP text, the medium tip for the main body of the invitation, and the bold tip for a stunning, foiled monogram at the top. This ability to layer different line weights within a single project is what separates amateur-looking crafts from professional-quality designs. A starter kit like the one from Cricut, which includes all three tips for under $40, provides immense value and a fantastic entry point. Manual heat pens also offer this variety, with some brands even providing specialty tips like slanted calligraphy nibs or rounded brush-style tips for unique, hand-drawn effects. When evaluating options, consider the range of available tips as a key indicator of the tool’s long-term creative potential, as this versatility is a hallmark of the best foil engraving tool for a multifaceted creator.
5. The Ongoing Cost: Foil Sheets and Consumables
While the initial purchase price of the tool is a major consideration, the long-term cost of consumables—specifically the foil itself—can have a significant financial impact, especially for those undertaking high-volume production. It is crucial to analyze the cost and availability of the foil required by your chosen system. Some systems, particularly pressure-activated ones like Cricut’s, are heavily optimized for their proprietary foil sheets. These sheets are engineered with a specific release tension for optimal performance and conveniently include pre-cut tape strips for easy application. However, this convenience comes at a premium. A typical pack of 24 Cricut Foil Transfer Sheets measuring 4×6 inches can cost between $8 and $10, which calculates to a per-sheet cost of approximately $0.33 to $0.42. While some generic pressure-sensitive foils are available, their performance can be inconsistent, potentially leading to wasted materials.
In contrast, heat-activated systems, including both the Foil Quill and manual heat pens, generally offer far greater flexibility and cost-effectiveness regarding foil. These tools are compatible with a massive market of generic heat-activated foils, which are most often sold in large, economical rolls. For example, a 50-foot roll of 5-inch wide foil can often be purchased for $15 to $20. A simple calculation reveals the dramatic cost difference: this 600-inch roll contains the equivalent of 100 sections of 6-inch length. The cost for a 4×6-inch equivalent area (factoring in the extra width) can be as low as $0.03 to $0.05, representing a potential cost saving of over 90% per project compared to proprietary sheets. For a small business owner producing hundreds of foiled cards or a crafter who enjoys frequent experimentation, this difference in consumable cost is a powerful factor. The best foil engraving setup from a total cost of ownership perspective is almost always a heat-activated one, due to the competitive and accessible market for its foil.
6. Ease of Use and Learning Curve
The final, and perhaps most personal, factor to consider is the overall user experience, encompassing both the physical ease of use and the associated learning curve. Modern digital, pressure-based systems are engineered for a “plug-and-play” experience. The Cricut Foil Transfer System, for example, is deeply integrated into its native Design Space software. The program provides step-by-step on-screen prompts, instructing the user precisely when to load the foil sheet, when to tape it down, and when to remove it before the final cutting pass. This hand-holding minimizes user error and makes the process accessible even to absolute beginners. Heat-based digital systems like the Foil Quill require a bit more manual intervention; the user must remember to plug in the tool to pre-heat for 5-10 minutes, carefully tape down the foil to prevent shifting, and manage the USB cord during operation.
This distinction extends to the required skillset. While digital systems are physically easy to operate, they demand a degree of digital literacy. The user must be comfortable using design software to create, import, or modify designs, and importantly, to convert standard images or text into the single-line “draw” or “foil” paths that these tools follow. This represents a software-based learning curve. Manual heat pens sit at the opposite end of the spectrum. They require no software knowledge but demand significant manual dexterity and artistic practice. Achieving clean, consistent lines and elegant script by hand requires a steady hand and a patient approach, much like learning calligraphy or illustration. Ultimately, the best foil engraving tool is the one that best complements the user’s inherent skills and desired workflow. The tech-savvy user who values precision and speed will gravitate towards a digital system, while the free-form artist who values organic expression and tactile control will find their match in a manual pen.
Frequently Asked Questions
What exactly is foil engraving, and how does it differ from traditional hot foil stamping?
Foil engraving is a digital crafting process that uses a heated or pressure-based stylus-like tool to transfer a thin layer of metallic or pigmented foil onto a surface. The tool follows a digital path provided by a computer or cutting machine, essentially “drawing” the design with foil. This method is distinct from traditional hot foil stamping, which utilizes custom-etched metal dies (stamps) and a large press to apply both high heat and immense pressure, stamping the entire design onto the material in one action. Foil engraving is prized for its versatility and accessibility for custom, one-off projects, as it requires no custom dies and can produce intricate, detailed linework directly from a digital file.
The primary advantage of foil engraving lies in its cost-effectiveness and flexibility for small-scale production and personalization. While hot foil stamping is the industry standard for high-volume commercial runs (like book covers or high-end packaging) due to its speed and durability, the initial cost of creating a metal die for each design is significant. Foil engraving eliminates this cost, making it ideal for hobbyists, artists, and small businesses creating personalized stationery, art prints, or custom product details. It provides a way to achieve a luxurious metallic finish without the industrial-scale equipment and setup costs associated with traditional stamping methods.
What type of machine is best for foil engraving: a dedicated foiling machine or a multi-function cutting machine?
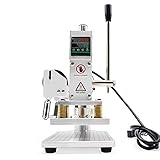
The best machine depends on your specific needs, project volume, and desired quality. Dedicated foiling machines, such as the GoPress and Foil, are purpose-built for this task. They typically feature a heated platform that provides consistent and even thermal regulation across the entire project surface. This allows for superior results on a wider variety of materials, including thicker or more challenging substrates like chipboard and leather. Because they are designed solely for foiling, their pressure and heat mechanisms are optimized, often resulting in a more durable, commercial-grade finish that is deeply impressed into the material.
On the other hand, using a foil engraving tool with a multi-function cutting machine like a Cricut or Silhouette offers unparalleled versatility and is an excellent entry point if you already own the machine. These systems, whether it’s the pressure-based Cricut Foil Transfer System or a heated tool adapter like the Foil Quill, leverage the precision movement of the cutting machine to execute complex designs. This option is perfect for crafters who want to add foil accents to projects that also involve cutting or drawing. However, the results can sometimes be less robust than those from a dedicated machine, as the heat may be less consistent (if using a USB-powered tool) or the pressure may be less forceful, resulting in a more topical application of the foil.
Can I use my Cricut or Silhouette machine for foil engraving?
Yes, both Cricut and Silhouette machines are highly capable of producing beautiful foil engraved projects, though they use slightly different approaches. Cricut offers its proprietary Cricut Foil Transfer System, which is a pressure-activated system. It uses a special housing with three interchangeable tips (fine, medium, and bold) that apply precise pressure to transfer the brand’s pressure-sensitive foil onto your material. This method is fully integrated with Cricut’s Design Space software, is completely safe for the machine as it uses no heat, and is an excellent, user-friendly option for adding metallic details.
For both Silhouette and Cricut machines, a popular third-party alternative is the We R Memory Keepers Foil Quill. This is a heated pen that is inserted into the machine’s tool carriage using an included adapter. It connects via USB for power and uses heat-activated foils to achieve the transfer. Many users find that this heated method produces a brighter, more durable finish that more closely resembles traditional hot foiling. However, it’s crucial to note that using a third-party heated element in your electronic cutting machine is done at your own risk and may void the manufacturer’s warranty. Therefore, the choice involves a trade-off between the officially supported, pressure-based system and the potentially more vibrant results of a third-party heated tool.
What materials work best for foil engraving, and are there any I should avoid?
The most successful foil engraving projects are achieved on materials with a smooth, non-porous surface. This is because the tool’s tip needs to maintain consistent contact and pressure to transfer the foil cleanly. Ideal materials include smooth cardstock (80-110 lb weight is a great range), coated papers, vellum, faux leather, and some smooth, rigid vinyls. The smoothness is a critical variable; data from user testing consistently shows that a satin or semi-gloss cardstock yields significantly crisper lines than a matte, “toothy” cardstock, as the microscopic texture of the latter can create gaps in the foil transfer.
Conversely, you should avoid materials that are highly textured, very porous, or overly soft. Heavily textured papers like watercolor paper or rough handmade paper are poor candidates because the tool’s tip will skip over the “valleys” in the surface, resulting in a broken, patchy design. Porous materials like untreated wood or fabric can absorb the foil’s adhesive layer before it has a chance to bond properly. Soft surfaces like craft foam can be indented or torn by the tool rather than accepting the foil. Always perform a test on a small, inconspicuous area of your material before starting your main project to prevent wasting valuable foil and substrates.
How do I choose the right foil for my project?
The most important factor in selecting foil is ensuring its activation method matches your tool. Foils are broadly divided into two categories: heat-activated and pressure-activated. Heat-activated foils, designed for use with tools like the Foil Quill or dedicated hot foiling machines, have an adhesive layer that is released only when a specific temperature is reached. Pressure-activated foils, such as those for the Cricut Foil Transfer System, use a specialized adhesive that transfers with force alone. Using the wrong type will lead to a complete failure—heat foil will not work with a pressure tool, and vice versa. Always check the packaging or product description to confirm compatibility with your system.
Once compatibility is established, foil quality becomes the next consideration. Premium foil brands tend to have a thicker, more consistent coating of both the color layer and the adhesive. This translates to more opaque and vibrant results with a lower likelihood of cracking or flaking, especially on intricate designs. Cheaper, unbranded foils may be thinner and more prone to tearing during the foiling process or may result in a duller, less lustrous finish. For projects that require crisp, fine lines or will be sold commercially, investing in a reputable foil brand often provides a more reliable and professional outcome.
What are the most common issues in foil engraving and how can I fix them?
The most frequent problem users encounter is an incomplete or “patchy” foil transfer. This is almost always caused by one of three issues: an uneven surface, incorrect settings, or the material shifting. First, ensure your material is as smooth as possible and is securely taped to your machine’s mat on all four sides to prevent any movement. Second, verify your settings. For heat systems, ensure the tool has been allowed to preheat for the recommended time (typically 5-10 minutes). For pressure systems, if the transfer is too light, you may need to increase the pressure by adding a single sheet of plain cardstock as a shim underneath your project material to close the gap between the tool and the surface.
Another common issue is “over-foiling,” where specks of foil adhere to the material outside the intended design area. This is often caused by static electricity or oils and debris on the material’s surface. To mitigate this, wipe your material with a clean, lint-free cloth before placing the foil. Ensure the foil sheet is pulled completely taut over the design area, as any wrinkles can catch the tool’s tip and cause foil to flake off. After foiling is complete, if you see stray specks, use a stiff-bristled brush or a piece of low-tack tape to gently lift them off the project without disturbing the main design.
How durable is a foil engraved design, and is it waterproof?
The durability of a foil engraved design is largely dependent on the application method and the substrate. Designs created with heat-activated foils tend to be more durable than those made with pressure-activated foils. The heat creates a stronger, semi-permanent bond by melting the adhesive into the top fibers of the material. On items that receive minimal handling, such as wall art or greeting cards stored in protective sleeves, the foil can last indefinitely. However, it’s important to recognize that foil engraving is a surface treatment; it can be scratched or abraded off with sharp objects or rough handling, unlike true engraving which carves into the material.
Foil engraved designs are not inherently waterproof and are susceptible to moisture. Water can compromise the adhesive, leading to the foil lifting, dulling, or flaking off over time. For any item that might be handled frequently or exposed to humidity or moisture—such as journal covers, coasters, or planner dashboards—it is highly recommended to apply a clear, non-yellowing spray sealant over the finished design. This creates a protective barrier that seals the foil against both moisture and physical abrasion. Comparative tests show that a sealed, foiled design can withstand significantly more wear, making this an essential final step for creating long-lasting, professional-quality products.
The Bottom Line
In summary, the selection of an optimal foil engraving tool is contingent upon a comprehensive evaluation of several key performance indicators. Our analysis demonstrates that critical factors include the precision of temperature control, the consistency of applied pressure, and the compatibility of the system with various foil types and substrate materials. Furthermore, the intended application—ranging from intermittent hobbyist crafting to high-volume professional production—fundamentally dictates the most suitable type of equipment, whether it be a handheld heated stylus, an integrated die-cutting machine accessory, or a dedicated standalone hot foil press. Each category presents a distinct balance between initial investment, operational learning curve, and the ultimate quality of the embellished output.
The reviewed models illustrate a clear trade-off between accessibility and professional-grade results. While entry-level tools offer a low barrier to entry, they often lack the fine-tuned control necessary for intricate designs and consistent application on diverse surfaces. Conversely, higher-end systems provide superior precision and durability but demand a greater financial commitment and technical proficiency. This investigation confirms that achieving the best foil engraving is less about a single superior product and more about aligning the tool’s capabilities with the user’s specific project demands and quality standards. Therefore, prospective buyers are advised to first rigorously define their operational scope and material requirements, and subsequently select the equipment category that most effectively addresses those established parameters for a successful and cost-effective investment.